IntroductionI have long been a fan of science fiction movies and anything futuristic. The idea of a robot as an assistant for human beings has been around for quite some time, and any science fiction story with respect for itself naturally has robots in it. Unfortunately, Hollywood has a tendency to portrait the robot as something evil that will take over the world. Fortunately, the Asian countries seems to have a more down to earth view of robots and their potential. Hondas ASMIO robot seems to be the closest we have gotten a good humanoid robot. Humanoid robots are very difficult to create, and it requires a full team of researchers to overcome the problem of balance and stability. All hobby based 2-legged humanoid robots are simply based on the robot having large feet so that the balance comes automatically. These are often simple small servo based robots and far too limited compared to what I want to achieve with my robot. This basically ruled out the whole idea of having a 2-legged robot and either deciding on a wheelbased one or a 4-legged version. Creating a 4-legged robot would have been possible, but would have required some powerful motors and most probably a wide base for the robot to have some height. It would probably also scare the kids! :) So I did some research and came over this brilliant project: Open Automaton Project. Dafydd Walters has more or less described exactly what I was going to try with my robot project. Its based on low cost components that anyone can get, hopefully at a total price lower than $1000. One of the main ideas is for the robot to be self-powered and run a full featured motherboard to make it simpler to develop software for as well as interfacing components like cheap webcameras. The technology to do this is all here now, its just a matter of assemblying it and developing the software to interface it all. There is also a wealth of software APIs both free and for purchase that will enhance the features of a wheel based robot like these. The only thing I didnt like about OAP was that it was Linux based. Although I fully understand that Linux is free and all I am not comfortable in that OS and the range of software for it is more limited. As an example, I would not get a good enough speech recognition with it since nothing comparable to MS SAPI 5.1 is available to Linux. But my choice of programming language will be Java, which should run well on Linux also for those wanting to try that. Being comfortable in a Windows OS my whole life I wanted to stick to that, but generally only the speech recognition is the part that is missing for this thing to run on Linux. JCP1 was born
Next was knowing what to do with the webcameras. I installed Java Media Framework and managed to capture images from my webcamera with ease. I could do some simple image processing to get information out of it. I did a simple test where I held a colored card in front of the camera and asked the robot "what color do you see". It would then sample the image (centre) and analyze the color (quanitisise) to say the color. It was really fun although a simple application. I was happy with that for now, a bit unsure what to use the camera for. I later did some more research and found some papers on object detection based on Haar features which was very effective for face recognition. But it wasnt until much later that I realised this was implemented in Intels OpenCV project. At this stage I tested OpenCV out and see that it has a nice array of useable vision algorithms that a robot could benefit greatly from. The only problem was creating a Java Native (JNI) bridge to it. In time I came across RoboRealm, a free vision applcation that solved a number of problems and was very easy to use. Design - version 1
The image to the left shows the first design with 4 layers including the top (which will be covered). The main idea with this design was to have enough levels to add features to the robot at a later stage. The more layers the easier to attach something since you can use both the top and the bottom of each layer. I also wanted the robot to have an arced back so that it would look nicer when I add the 0.5mm think aluminium sheets to cover it. The original rendering I made way back shows this and I think it looks great. I also had to create a sub-layer at the bottom to have the wheels a bit higher since there is no way I can mount the Devantech motors without either having 2cm clearance or 8cm when I really wanted around 4cm which is the height of my caster wheel as well. The advantage of this solution is that I can adjust it if I want bigger wheels or some height adjustment. The extra layer is also a great place to put the motor controller. The lower layer also shows a grey box behind the battery which is the charger. I will only have this here if I can make the robot plug the charger cord into a normal wall socket sometime in the future. The layer above have the mini-itx board, and the one above that has the disk, compass and servo controller. The compass will most probably be moved about to find a spot with the least electromagnetic disturbance. Essentially as far away from motors and servos as possible. The robots head is just a quick mockup as I still have to figure out which parts to get for the tilt/shift and how to attach it all in a frame so I can cover it up with aluminium as well. For attaching the aluminium sheets I think I will actually use velcro! Yes some metal brackets at each layer with the velcro and similarly placed velcro on the sheets. This will make it easy for me to asseble and disassemble the shell. The weight of these sheets is really minimal so it should stick securely. Design - version 2I have later done a redesign of the robot where I have removed one layer and added another sublayer similar to the one where the motor controller sits. There was really no need for this many layers in the first implementation and the prototype so far seem to hold together nicely. I have also ditched the idea of arcs at the backside of the robot simply because I do not have the tools to do it. If I create a JCP2 I will most probably use a plastic cutter company to give me some nice precut ABS sheets according to specs. JCP1 is my DIY prototyping droid so I have to lower my expectations quite a bit about how it will look in the end. Still I'd like to have a high standard as my goal and learn what when wrong and how to improve it. It makes it all the more fun when JCP2 will be started! :) The new layer structure makes more sense also since it moves the mini-itx board a bit higher and it provides me with an angle front at the top which is a very nice place to put a nice small touch screen (Lilliput) which I might explore someday. It would be cool if the robot could show some information, movies and pictures on the screen as well. A touch screen would solve a lot of input problems also - where I would otherwise have to add lots of obscure buttons around the robot. Chances are that I will use Remote Desktop a lot in the beginning unless that eats up all the CPU on the mini-itx system. The first layer is 4cm from the floor. And the height of the base totals 44cm (so 40cm for the layers, which is the height of the aluminium sheets I will use as "skin". The head part will most probably have a small neck and a head enough size to mount two servos, one webcamera and a small speaker inside it. The original sketch has two cameras, but I will limit JCP1 to a single monoscopic camera. There is enough challenges in getting one to work so I wont bother with two until I feel I am ready for that. So the head will probably look a bit funny, which I dont mind at all since I'd rather have people laugh than be scared of it! :) The neck will ensure that the head can be tilted enough forward and backward so that it can see its "feet" and looking up at peoples faces. If it can see the area on the floor in front of it I will be able at a later stage to maniupulate a gripper that can grab objects on the floor. For that to work I need the head to have a clear view of the gripper and area of the object. Since the arm will most probably be mounted on the middle on the side of the robot it should extend some 30-40 cm stretched out, which means it can only grab items on the floor that is a few centimeters from the front of the robot. Will post some images of the new design here soon... Design Ideas for JCP2The first prototype still has a number of options and was actually designed to feature a touch screen and an arm or two. But its clear that a JCP2 will have to be created with more precision than sawing plexi glass in the garage and bending aluminium plates on the kitchen table. :) Here is a list of things I would love to do with a JCP2 design: Pre cut plastic. There are quite a few companies that can laser cut e.g. ABS plastic according to drawings, and I would like my next project to use that. Since I naturally wont have the budget to create an extruded plastic frame like a professional production facility, I guess JCP2 will still consist of simple pieces to assemble. This is also nice if I decide at some time to make robotics kit for resale. Pololu has a nice Custom Laser Cutting Service that I might consider for a new base. This would solve a number of precision details where panels on the outside did not fit as well as they should. Removable panels. JCP1 had simple bent thin aluminium panels that were fastened with velcro to the levels inside the robot. This is a very bad construction and the panels would come off after a while. And although the velcro damped sound somewhat, it was hard to take the panels off if the velcro pieces was too big. I'd like the next version to have a better mecanism for hooking the panels on and taking them off. Preferably with rubber edges or "linings" of sort so that it doesnt have any sharp edges. My initial idea was for the panels to be mounted on hinges and a servo controlled open/close function for accessing the internals, but would require a manual override in cases where batteries are dead. A solid head design. The head on JCP1 was a simple mounting of webcamera on top of a USB speaker which was then fastened to the servos used for pan and tilt. JCP2 will have an actual designed head with two cameras for stereo vision as well as a speaker mounted inside it (with opening). Chances are that I will also add a stereo microphone split up on each side of the robots head to simulate ears and experiment with sound localisation. The neck will also be mounted on a wider rotating base for better support (the head has a tendency to flop about a bit now). I will also strip any plastic on wires and shield them to reduce the dragging and pulling when its moving its head about. All of this will hopefully be more camuflaged using a soft neck fabric (I will experiment with this on JCP1 first ofc). Ultrasonic array. JCP1 only has one ultrasonic sensor in front atm, and chances are I will add at least 3 more (1 on the back and 1 on each side). A next version will have this as a minimum, and perhaps one mounted on the head so that can be used for scanning in front of the robot without rotating the wheels, as well as being able to tell the distance of an object in its view centre. Chances are I will use a sensor that has a more narrow field of view for this, although stereoscopic vision will also help figuring the distance to things in its view. Recharge docking station. It is clear that it will take a long time until I can create something that can run the whole day on a recharge so the battery has to be recharged fairly often now. The SLA battery can be maintainance charged as often as possible and will not take any damage from this. It would be nice to have the robot "plug itself" in to a wall socket to simplify this. I have experimented a bit with the force needed to do this and the wheels on it is able to push a normal power plug into the wall socket, as well as pull itself out. However, since wall sockets are of different height and floor friction can vary, I plan to create a docking station with rubberised floor, but still use a normal power socket. The advantage is that the robot can then be charged anywhere since the necessary charger is on the robot all the time. The docking station could also use markers on the floor to better guide it the few last centimeters, although if the robot docks itself with the face towards the wall it could use its vision to perform this fine adjustment too. I would prefer it to back itself into the charger though since I would be able to interact with the robot while charging. Arm. The original design has room for two arms, and chances are that I will try to get some LynxMotion SES assemled arms on this robot. I have not yet decided on how many degrees of freedom I want, but JCP2 will not be complete without an arm or two. The exterior of the robot needs some way of resting its arms so I might have to make the design a bit different on the sides as the elbows probably needs to go a bit further back for it to rest the hand on the wheel arc. Servos will suck the batteries dry if they have to struggle to hold a position all the time and I dont want the robots relaxed position to slide the arms out on the floor in front of it so I probably have to use rubber on the wheel arcs and a similar material on the part of the arm that rests on it. At the same time the arms needs to be long enough so that it can reach out and grab an item on the floor. Vacuum module. It would be really cool if I could create the robot with the option of a module that can be swapped out. A complete vacuum cleaner would be really nice and there are many small handheld ones that could easily be built into something to fit the robot and only requires a relay switch to turn it on and off. I cant think of any other modules right now, but rather than designing it specifically for the vacuumer, I'd like to make it more modular where a whole "slot" in the robot can be changed. The vacuum module would naturally have to go all the way down to the floor so that indicates that perhaps the whole lower front or back of the robot would have to be modular. Designwise I would have to fit this next to the motors and controller which now take a big part of the lower front. Make it taller. I would like to make JCP2 at least 10 cm taller, and I think the base would easily cope with this without becoming wobbly. It moves about fairly solidly now even at high speeds (using manual control with the Wii controller I can run it dangerously fast). I might just make the shoulders a bit higher and slimmer than it is now. In one of my original ideas, the back part slants at an angle up to the shoulders also, since there really isnt that much electronics needed inside it. Software. This is a natural progress of the JCP1 software. The most severe lacking parts of JCP1 is navigation. For JCP2 navigation has to be solved in a way that it can navigate itself between rooms with no problem and have tasks where it has to go to a specific room or location within a room. Also, the amount of agents should be solid so that it can do a number of useful tasks like keeping track of a calendar, search for things on the net, access your home entertainment system and assist you with many information needs. Chances are a number of these will find its way into JCP1 long before I start a the JCP2 design. Remote agent server. I will probably prototype this very soon for JCP1. A simple software agent that provides access to a computers resources. It will be able to open a fullscreen visualisation, stream sound to it, operate media on the computer and start RoboRealm and other vision computer processes. The general idea is for JCP2 to utilize any computer currently running the agent server and be able to use them to show things to an operator as well as offloading the robot CPU with heavy tasks like vision. The robot will also be able to know which screen it has access to based on its location so it can use the closest "terminal". Hardware and SoftwareI have made some simple tables with a list of the hardware and software to be used on the robot. - Link to page about Hardware and Software Random IdeasI have made a page where I plan to list some random ideas that spring to mind and how they can be implemented. I generally feel that a lot of people who do robotics projects are overly focused on the hardware and dont really see the challenges that is found in software. The idea is that the robot has to feel autonomous in that it can move around by itself in some intelligent fashion, have its own goals and have interesting dialogues with people around it. Basically it has to react to the environment in a way that it isnt just a remote controlled device. After browsing the many robotics projects out there I feel many projects stop at that. Maybe its because it wasnt until now you have the required processing power to pack a lot of intelligence into the robot at a cheap price. With distributed computing this becomes even more an important step for robotics, and enables it to seemingly have endless processing power. As an example, the OpenCV object detection code can on my desktop computer (a Pentium 530 - 3 GHz) find faces in a 320x240 picture in approximately 30 ms. So essentially it can recognize faces at a rate of about 30 fps which is really amazing. The Haar detection scheme can detect many types of objects if you just train it up with different sets of images and create a cascade for each object you need to recognize. Of course there will be many false recognitions but this can be somewhat remedied. The idea is that if you have a network of computers they can each run the same image through their cascades and your robot will seemingly have an amazing recognition ability with many objects being recognized. Well enough for now, here is the link to the page on random ideas. - Link to page about random ideas What can it do?Here is a link to a page with specifications of the robot and a list of things it can do so far... |
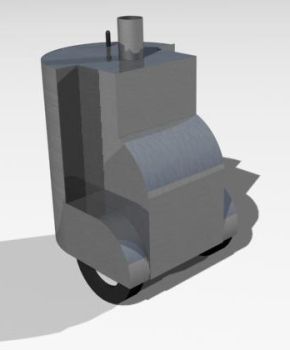 Well, at least on paper. I did some drawings and played around with 3dstudio max and came up with something I liked, a design for a base. The design
for the head was not started as I wanted to know which parts I could get to achieve a good design first. I also started some software work, trying to
make a Java program that was speech enabled. With that I mean, full speech recognition and text to speech output. I achieved this by buying CloudGarden
Java Speech API implementation that bridged Microsoft SAPI compliant software to Java. Amazingly it worked better than I had expected and had a simple
agent running on my computer that I could give simple commands to, although I could also dictate to it and e.g. make web searches for me. I made a simple
module where I could ask it "show me a picture of a house" and it would connect to altavista and do an image search on "house" and show the image in
a window. This was enough proof for me to know I would be able to communicate with the robot. The API also has grammars which would enhance recognition
rates quite a lot since it limits the vocabularly dynamically. It also provided me the ability to switch contexts by enabling and disabling grammars
which is very useful for a robot. I wanted the robot to have some understanding of context, so once you have started a certain module it would know
that your commands was most probably related to this. It would go out of context after some minutes in idle state. This formed the basis for a natural
way of interaction with the robot.
Well, at least on paper. I did some drawings and played around with 3dstudio max and came up with something I liked, a design for a base. The design
for the head was not started as I wanted to know which parts I could get to achieve a good design first. I also started some software work, trying to
make a Java program that was speech enabled. With that I mean, full speech recognition and text to speech output. I achieved this by buying CloudGarden
Java Speech API implementation that bridged Microsoft SAPI compliant software to Java. Amazingly it worked better than I had expected and had a simple
agent running on my computer that I could give simple commands to, although I could also dictate to it and e.g. make web searches for me. I made a simple
module where I could ask it "show me a picture of a house" and it would connect to altavista and do an image search on "house" and show the image in
a window. This was enough proof for me to know I would be able to communicate with the robot. The API also has grammars which would enhance recognition
rates quite a lot since it limits the vocabularly dynamically. It also provided me the ability to switch contexts by enabling and disabling grammars
which is very useful for a robot. I wanted the robot to have some understanding of context, so once you have started a certain module it would know
that your commands was most probably related to this. It would go out of context after some minutes in idle state. This formed the basis for a natural
way of interaction with the robot.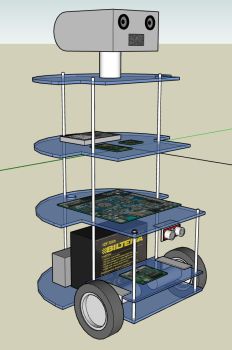 Google Sketchup is a really nice application indeed! I used this to create the whole design for the robot with precise measurements. It really
is a brilliant design tool. And its totally free too! What more can you ask? :) - Well, I wanted the design to have some flexibility with what
I choose to add to it at a later stage, so I have tried to make room for some interesting features for the future.
Google Sketchup is a really nice application indeed! I used this to create the whole design for the robot with precise measurements. It really
is a brilliant design tool. And its totally free too! What more can you ask? :) - Well, I wanted the design to have some flexibility with what
I choose to add to it at a later stage, so I have tried to make room for some interesting features for the future.