 | 3mm Plexi glass
Bought a sheet at Coop Bygg that was big enough to give me 4 sheets at 30x30 cm which was the size of my base. Would have preferred at least 4mm for the base level where the main weight of the robot will rest. Chances are that the plexiglass will bend at the weight of the battery that is 3.3 kg. I really wanted to get some ABS plastic sheets instead since that has lighter weight and probably more rigid. Be careful with plexi glass though, they can easily break at the edges if you put too much pressure while drilling. Take it slow and the friction heat will help you. After I had cut up all the sheets according to my design I chose to stack them on top of eachother to drill holes for the rods through them all, which resulted in the bottom sheet being cracked at every hole. Fortunately I had one spare sheet. Next time I hope to find a supplier that can also cut the sheet in the required shapes, something like RPlastics. Problem is that it will probably cost a lot shipping this to Norway. :( |
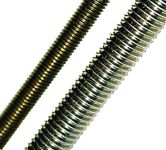 | 5mm threaded rods
After some research on how to build the base I chose this simple method which also allows me to adjust each level at a later stage if I need to. Got some normal washers and nuts, but see that I should have gotten some locking nuts because the nuts will unscrew as the base is shaken somewhat. I also realised that it takes some time screwing all these nuts on the rods, the locking ones must be a pain. ABS plastic tubes would again be better since it has less weight and is probably easier to work with although you then have to decide exactly the arrangement of your layers before cutting them. After some work with my prototype I have come to the conclusion that threaded rods is ideal for robotic projects like mine. |
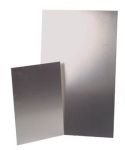 | 0.5 mm Aluminium sheets
Clas Ohlsson is selling some 40x25 cm sheets of aluminium and the 0.5 mm thick ones are naturally very lightweight. I really want to build a chassis for the robot in brushed aluminium. Will probably take 5 sheets to cover it nicely. The only challenge is to find a good way of joining the seams between the sheets in a way that is both aestetical and practical. Practial in the sense that it should be easy to take the sheets off the robot. I have been trying to find a company that sells some rubber or vinyl joints for both corners and straight joins. One option I have been contemplating is to make my own, by using aluminium profiles that I can cut and glue some leather imitation stuff around. Each profile can have some plugs attached, and aligned sockets mounted on the robot so that they can be inserted. I just dont know what kind of plug/socket I can use for this. |
 | 4 cm high Caster wheel
The caster wheel was bought on Clas Ohlssos, and the one the picture is a little taller (4,8 cm) - they dont seem to have the one I bought. I would have preferred these new cool spherical casters made by an Italian company. These would also avoid the movement shift you get from the castert when the robot is reversing direction. Here is a US Supplier also. My current caster wheel also needs some grease, because its quite slow to turn with the full weight of the robot. |
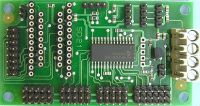
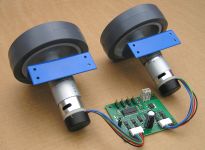 | RD01 - Wheels, motors and controller package from Devantech.
This consist of Devantechs MD23 controller and EMG30 motors mounted on a bracket and wheels connected. I really wanted a complete package for the robot and Devantechs I2C devices is really great. The MD23 controller regulates 12 volt for the logic and even supplies 300 mAh (up to 1A if heatsink is installed) from 4 I2C ports on the board. This is excellent as it gives me enough power to the rest of the sensors. According to Devantech the regulator should be able to handle voltages up to 14.7 when the battery is charged. Devantech has been very helpful with information about their devices and told me their test robot weighs 5.5 kg and is very responsive with this kit. My goal is around 8 kgs which this should also handle fine. The controller also has registers to read out the voltage of the 12 volt battery connected which is also very useful for the robot. Some rumours on the OAP mailing list say that the gears inside the motors are not very durable, but I guess I will find out. |
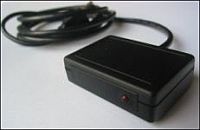
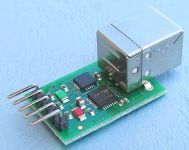 | USB to I2C Interface module
This is the bridge between the motherboard and the I2C devices. The module drivers acts like a normal USB Serial port so it should be fairly easy to program from Java (or any other language). The controller gets power from the USB port and have 70 mAh power to use for sensors. I might use that if I cant get enough out of the motor controller connectors. |
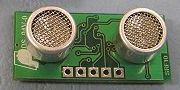 | SRF10 Ultrasonic ranger
Devantech is well known for their ultrasonic rangers, the SRF04 is found on many robots today, but does not have I2C support. The SRF10 is one of their latest versions with I2C support and it is also very small. It has a range of 6 cm to 6 meters which should be enough for my robot. It was this or the SRF08 which has some very good specs as well as having a light sensor and multiple echos recorded. I have only bought one ultrasonic sensor but I think I will kit the robot with some more depending on how useful I feel they are. Chances are that I will get some of the cheap SRF02 rangers with minium range 15 cm for the back and side of the robot. |
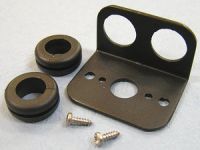 | SRF10 Mounting Kit
One big advantage of the SRF10 is that Devantech also has a mounting kit which simplifies the whole construction. If I had bought the SRF08 instead I would have to get some mounting kits from elsewhere (e.g. Lynxmotion). |
 | CMPS03 Magnetic Compass
Although according to Devantech a magenetic compass can be very unprecise due to magnetic disturbances I think it will help a lot for navigating the robot. Their FAQ describes a lot about its limitations. I assume I will try to calibrate this according to my house so that it can find North at least in my house! Other than that I have to be careful so it isnt close to the motors in the robot so I will have to experiment somewhat to find where its best to have this. I am also unsure how my aluminium casing will affect the precision. Again, this device uses I2C and is very easy to interface. The accuracy of 3-4 degrees should be enough for the robot. In any case I need to find some way of recalibrating the robots position in my house based on some information from the web cameras. Some information that helps it triangulate its position at times. Navigation will by far be the most challenging aspect of the robot. It would have been cool to equip it with a GPS but that requires a clear view to the sky and this robot isnt built for going outdoors. With the amount of rain we have here, it would short circuit very quickly! :) |
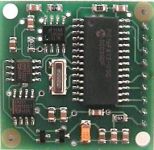
 | SD21 Servo Controller
This controller is also using I2C and can control up to 21 servos which should be more than enough for my robot. The controller also doubles up as a place to put a Basic Stamp BS2p chip as an extra microcontroller in case I need non-I2C interfacing as well as some autonomous operation if the main computer stalls (happens frequently with Windows XP). It also has 3 I2C connectors, which means I have 2 free for connecting other devices. The power for the logic will come from the motor controller. The main challenge with this is that I need a separate 6 volt of power to the servos. I will have to create a small power board that can regulate from 12 volts to 6 and from what I know so far a switching psu is more effective than a linear. This is really the only electronic component I have to make myself unless I find a prebuilt regulator for this. |
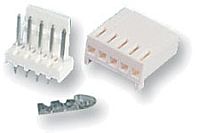 | Molex header, housing and pin
Again, Devantech was very helpful and pointed me directly to the connectors I need to wire all this up. Farnell is a possible place to get these, but really any electronics shop should have these available. All servos have a wire already so I hope I dont need any more. The servo controller will sit in the middle of the robot so that the wires will reach the places where the servos are. The molex connectors are mainly to connect all the I2C stuff and I probably need to custom make these since there are some places I will need power along the lines, and some where I dont need. You might also find a lot of these in old electronics trash. The pin spacing have been a standard for quite some time. |
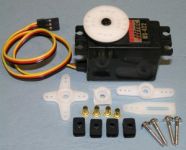 | Hitec servos
I think Hitec has a nice array of servos that work fine within robotics. The nice thing is that they have different durability and torque but often built into the same package. I can then exchange servos with more powerful ones when I need it. At first I will only need 2 servos for the pan/tilt of the head. But later I can see using 1 more for a charger-plug elevator/extender, 4-5 more for an arm based on Lynxmotion servo erector set. And if I feel the arm is working great I might add another one. Servos are fun so any cool things I can do with them is nice! :) One think I want to minimize if possible is the "dangling" of the joints that it controls. I hope I can get them as stiff as possible. |
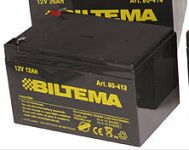 | 12 volt 10 Ah battery
I bought a cheap Biltema battery which should give enough power to run the robot for at least 2-3 hours without a recharge. My main concern is of course weight, and this battery weight 3,3 kg which is almost half of my weight budget. At the same time the battery provides some good stability and low centre of gravity as an added bonus. If I was a rich man I'd power it all using NiMh batteries, which would half the weight alone. |
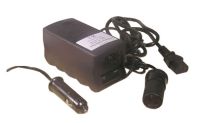
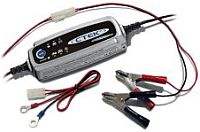 | CTEK XS 3600 Battery charger
This is supposedly a very effective and smart charger that is very safe for the battery and electronics connected to it. This was my main concern because I want the charger to work while the robot is still active (although when charging itself it should power down to standby depending on how depleted the battery is). The charger has two modes, one 0.8 amps for batteries below 14 Ah and a 3.6 amps mode for anything above. |
 | picoPSU-60WI 6v to 26v DC-DC converter
The picoPSU is very small and hook directly into the power plug of the motherboard which is really great. This version can tolerate a wide range of voltages which makes it perfect for tolerating the higer voltage on the battery while it is being charged. This PSU does not provide any useable 12 volt but that isnt really needed since I will only use a 2.5" laptop drive on this, and optionally a slim slot-in optical drive. |
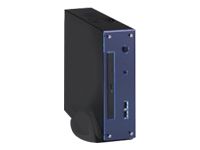 | Morex 3688 Micro-ITX Case
The main reason for ordering this was to have a temporary place to configure and test the whole system before I install it in the robot. I will not mount the case inside the robot, that adds too much weight and I dont need the psu inside the case either. Another advantage is that during development/testing I get a 60 watt external PSU that I can hook up. Chances are that I will add a switch and a plug so that you can hook the external power to the robot and switch between battery and power. But external power will only be provided for the motherboard and not the motor drive and other I2C devices which will always be on the battery power. I will most probably use the power/reset/led board as well as the front usb board inside the robot too. |
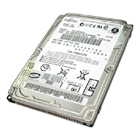 | Fujitsu 20GB 2.5" Harddrive
I had a 20 gb laptop drive that I used in a photobackup device earlier. I think 20 GB will be more than enough for the robot software! In time I hope to replace the drive with a flash based one, but that requires quite a bit of tweaking with the XP installation and needed software. |
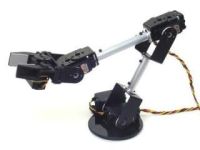
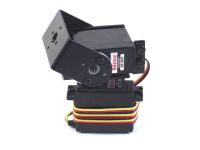 | Lynxmotion Pan/Tilt Kit
The head requires a pan and tilt function and although I could try to make appropriate brackets for the servers myself I feel that Lynxmotion has a very good selection of server fixtures. Among them the pan tilt set. This will be mounted on the neck of the robot and I will add a bracket that will hold the rest of the head frame where the cameras, microphone and speaker will be. The head itself will be skinned using thin aluminium sheets like the rest of the body. |
 | Trust 2850p USB Speakers
These speakers are fairly small and powered through the USB port which makes them very convenient for a robotics project. The form on them makes them almost look like eyes, which might be a way to mount them on the head. However, weight might be a bit too high for the HS422 servos to hold them at an angle without drawing power. I can solve this by "parking" the servo head in an upright position as often as possible. Chances are that I will open to check out the internals and if its possible for me to take one element inside one speaker and mount that on the head if power draw becomes a problem. |
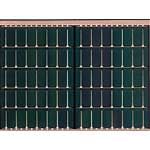 | 6V 100 mAh Solar Cell
This is a little fun experiment by equipping the backside of the robot with a solar cell that can recharge the 6 Volt battery pack for the servos. It would be cool to have the robot drive over to the window and bask itself in the sun! That is, if we ever see the sun again here in our parts of Norway. :) Although the 6 volt battery was dropped from the design, I plan on adding some larger ones that can charge the 12 volt battery. The backside of the robot can easily fit 2 larger powerfilms which should provide around 200 mAh at up to 16 volts. |
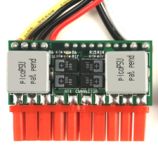
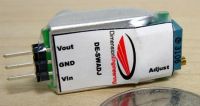 | 10W Step down adjustable switching regulator
I really wanted to ditch the whole 6 volt battery and have one 12 volt battery power it all. I then came across this excellent company which sells a nice switching regulator. For anything above 100 mAh you should always use a switching regulator and not a linear one sine a linear will dissipate a lot of energy as heat. This switching regulator will provide 1 Ah power, enough for 3 standard size servos stalling, or 4 if they are used intermittedly. If possible one could try to avoid moving all servos at the same time and have more servos per regulator. These are quite cheap and can be connected in parallell also. |
 | USB Uirt - IR receiver/transmitter
To enable the robot to turn on and off the tv/stereo I needed something that supported the UIRT protocol which is different from IRDA which computers use to communicate through IR. Well the USB-UIRT has it all and there is an open source java project that integrates nicely with it. This way I can just use my remote to learn the robot commands for tv on/off, amplifier on/off, volume, mute, etc. I might get it to operate the HTPC as well just for fun although for remote control of music playback I want to install an agent on the htpc and have it communicate wirelessly instead. |
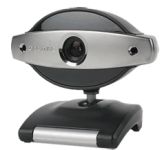
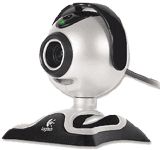 | Logitech Pro 4000 web camera
I first bought a very cheap Creative Live Vista web camera, but after seeing how badly it performed in low light conditions I exchanged it for the Logitech camera I had which is quite brilliant in comparison. If I am going to explore stereo vision sometime I'd just get another Pro 4000 camera. |
 | Intel D201GLY2 Celeron 1.2 GHz motherboard
A very cheap ($75) but powerful motherboard that is 2-3 faster than the Via board I used before. |
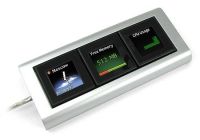 | Optimus Mini Three
3 OLED screens with 96x96 resolution each that also acts as buttons. Uses usb/com port driver and you can get approx 3 frames per second. Very nice for showing status information as well as providing a simple user interface. |
| Windows XP | You might wonder why I chose Windows XP and not Linux? Well, first I am not comfortable in Linux so I would spend more time trying to understand how it works than actual productive work on the robot. Also the Microsoft Speech API is really great and absolutely a necessity for my robot to work. I have a good experience with Windows XP and will most probably try to minimize the number of processes to a minimum to speed it up and avoid interruptions from the OS. |
| Microsoft SAPI 5.1 SDK | I tried this out on a small tablet PC and was amazed how far they have come with their Speech Recognition engine. With a little training it has very high accuracy and with defined grammars instead of dictation you have even higher rates. The text to speech (TTS) features is also very good and there exists quite a few nice voices that are MS TTS compatible now. |
Java JDK 6
| The latest Java API with all bells and whistles. I have 10 years of Java programming experience so there was no real option to use any other language for the robot. Java works great for this and is usually fast enough. For computer intensive things I will use JNI to interface to native code, most noteably the OpenCV library. |
| Java Media Framework 2.2.1e | The JMF API works great for interfacing with a web camera which is necessary for the vision. Hopefully its possible to interface with two camera streams at once although I have heard rumous that JMF doesnt work with 2 streams. Still stereo algorithms is far ahead in the plans. I might consider dropping JMF all together and use OpenCV for grabbing web camera images also in the future. This depends on where I want to do the majority of image processing. The sad news about JMF is that Sun has stopped development on it, but fortunately it works fine as it is now with most USB cameras. |
| CloudGarden JSAPI | This API is a nice Java Speech API implementation that bridges it with SAPI 5.1 and works very well for both speech recognition and speech output. So far this proves to work brilliantly. |
| Cepstral Text-to-speech voices | Very good speech synthesis that support MS SAPI. JCP1 uses the voice called David, and this is also the nickname my robot has gotten. |
| OpenCV - Intel® Open Source Computer Vision Library | This librarys most important feature is the Object Detection algorithms using Haar features. By training the system with a set of images that output a cascade description that is used for recognition, this is fairly accurat in identifying objects. Its most notable use is face detection which is working "out of the box" and will definitely be used for the robot to look at you. The object detection is a CPU demanding feature so if I run into problems doing this efficiently on the Mini-ITX I might create a server application that can run on a standalone PC which the robot will talk to wirelessly. I might even experiment some with having an array of computers so that it can have very powerful vision algorithms running all the time. |
| RXTX Com library | A Java library for using the COM ports. Sun has stopped developing their own, but fortunately this library works great! |
| RoboRealm | An excellent vision ananlysis program that has a server API option which you can send images to. I am using this on a powerful desktop which the robot sends images to. You can also remotely trigger loading of scripts so you can change what its "looking for" dynamically from the robot. |
| USB-UIRTJ | A java native wrapper to USB-UIRT DLL with sample code for learning and playback. |
| AnyDVD | A DVD backup tool. |
| CLAMP | Command Line Winamp, a nice simple tool for controlling a winamp player. I use this in my remote servers for playing music (until I add mp3/wma/wav plaback in my code directly). |
| Tesseract | Command line OCR which I use whenever the robot needs to read anything written on paper. Open source and works very well. |
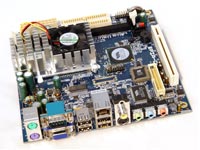 | Epia CN13000G Mini-ITX motherboard
These small motherboard are very nice for robotics, since you can run Windows or Linux on them and have enough ports to connect web cameras for eyes, mic, speaker, i2c-usb and more. My main concern is the CPU power which might be too small for advanced vision processing. I will do some benchmarks on this and if I get in trouble I will add support for vision servers that can run on a computer available through the wireless network. The size of these boards is only 17x17 cm and fits perfectly in the robot. I also bought 512 MB ram to the board, which is probably enough for the robots software. Was too slow for both web camera feed and speech recognition. |
 | 6V 5h NiMh battery pack and charger
This is a nice 5 Ah NiMh battery pack that should power the servos for some time. The nice thing is that it has a very small embedded charger in it that you just connect to the wall socket. This would be nice if I make the robot in a way where it connects itself to recharge. According to specs, it should be possible to use the battery while its being recharged. The weight is around 700 grams (with charger) which is not so bad. I might consider kitting the robot with a smaller 12 volt SLA battery to compensate for the weight loss. I might consider buying the battery pack and charger separate if I choose to use the charger outside the robot instead (requires a docking station then). I have since dropped this idea since I found a nice switching regulator that gives me 6 volt from the 12 volt battery instead. However, their battery packs are still of interest, but then in the 12 volt size. NiMh has double the energy density compared to a SLA battery. |
 | Creative Live! Cam Voice
This webcamera has two microphones mounted on each side which provides noise cancellation which might improve voice recognition and make the microphone more directional. The robot would then have to face the talker to get good results. It also looks pretty cool and would work great with the Trust speaker under it. However, I have also read some reviews saying that it is very wide angle that distorts the image very much. Some tests also say that with the array microphones in noise cancellation mode will also make your voice sound "digital". That can totally ruin speech recognition, which again defeats the purpose of the array mic camera in a robot. |
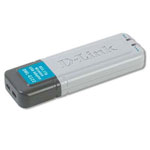 | Dlink 54 MBit/s Wireless Dongle
The robot will of course have access to the internet, but more than that it will have access to distributed computing. This can greatly increase the "intelligence" of the robot since it can use a powerful desktop/server computer for vision processing. A typical image with resolution 320x240 (24 bit) will only take 230400 bytes each (uncompressed). I could also choose to send the whole webcamera stream to a remote computer as well at a later stage. Distributed processing might be a requirement for this to work actually since vision computing takes a lot of CPU power, and the Via C7 CPU will have more than enough work just gathering the image data as well as speech output and speech recognition. |
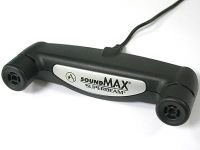 | SoundMax Superbeam Array microphone
This microphone seems like a very good alternative as the robots "ears". The array mic is directional and cancels out noise in the surrounding in such a way that you can use speech recognition even at a distance from the microphone (about 1 meter should be ok). The width of this mic is 11 cm which will fit perfectly on the robots head with one mic on each side of the head to form some kind of ears! :) The mic itself isnt expensive but it requires a certain sound processing chip that they sell in a USB package - total price is around $80. |
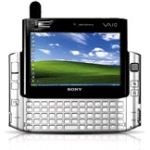 | Sony Vaio UX180p It is quite clear that the Via Epia C7 mini-itx board I use today isnt very powerful. In fact it was much weaker than I had imagined in spite of it being a 1.3 GHz CPU. Intel Pentium M and their new Core series are superior and will offer double the speed even in a 1.0 GHz package. Another problem I soon realised was that even if the C7 CPU consumes very little, the whole mini-itx board consumes quite a lot. If you then start looking at the alternatives you generally find two, either you can get a Pentium M / Core Solo laptop or a UMPC. The laptop would have to be a very small one so that you can fit the whole thing in the robot, and could be a bargain if you find a cheap one. You might even use the screen if you can align it in such a way that you can mount it. However a much simpler and more useful solution is to get a UMPC with a touch screen. I already have a Samsung Q1 Pentium M 1GHz which has arithmetic performance about twice of the C7 1.3 GHz CPU. But I use that so often that I didnt want to "waste" it on the robot. However if money wasnt the issue I'd go and buy a used Sony Vaio UX180p immediately. The really cool thing about this is that it has a docking cradle that you could place on the chest of the robot and have a full blown touch screen there to operate it or just show info that the robot has. The cradle has 3xUSB ports to connect to the robots other parts (e.g. webcamera and i2c), and you could use the microphone and speaker on the UX as well. When the robot is "parked" you could then remove the UX from the cradle and use it like a normal UMPC. The Core Solo 1.2 GHz it has will perform at least 3 times better than the C7 1.3 GHz so its really a brilliant package you get here. The UX consumes very little power compared to a custom Via based solution and you get a big harddrive, 1 GB ram along with it. The only thing you might need in addition is an extended battery to keep it going for at least 5 hours without a recharge. The advantage is that the robot doesnt need such a big battery for the rest of the electronics. Again, if I could afford it I'd go for this anytime. |